Here’s how to make perfectly crispy tofu in just 20 minutes with golden outsides and a tender interior! My three easy methods require no pressing and uses simple ingredients.

Over the years, I’ve become a huge fan of tofu. Here’s a way to prepare it that I can’t get enough of: crispy tofu! It’s easy to make and comes out perfectly seasoned, with extra crunchy edges and a tender interior.
I love that there’s no need to press the tofu in this recipe, making it quick and easy for weeknight dinners! It’s actually pretty amazing that it can go from a bland blog to meaty, savory cubes in just 20 minutes. This recipe is even faster than my popular baked tofu recipe and tastes just as delicious!
5 Star Reader Reviews
 “Whenever I make this, which is often, I could pretty much eat the entire batch for dinner. I have to restrain myself, if not sharing a meal, to save some for leftovers. It’s addictive. Bravo for another great recipe!” -Ruth
“WOW!!! Absolutely the BEST tofu recipe ever! Thank you so much for sharing. Our new go to that’s for sure.” -Laura
Ingredients You’ll Need
This crispy tofu recipe takes just 5 ingredients to make crunchy squares that are perfect for topping salads, bowl meals, and more. Tofu is simply soy milk that’s turned into curds and pressed into blocks. It was invented in China and is used in many Asian cuisines from Chinese to Thai.
Right out of the package tofu is unseasoned and soft, but when you cook it properly it tastes meaty and textured! Here’s what you need for this crispy tofu recipe:
- Extra firm tofu: This is important! Do not make this recipe with anything other than packages labeled “extra firm tofu.” Firm tofu or silken tofu will not work here.
- Cornstarch: Cornstarch makes for crispy edges! This ingredient is also required. If desired, you can substitute arrowroot starch.
- Olive oil: Use olive oil for cooking the tofu in a skillet.
- Toasted sesame oil: Toasted sesame oil is for seasoning the tofu after cooking it. Make sure it is marked “toasted” on the bottle; regular sesame oil does not have the signature sesame flavor.
- Soy sauce or smoked soy sauce: Use smoked soy sauce (smoked shoyu) if you can find it: it adds a delightful smoky savory flavor. If desired, you can substitute tamari for gluten-free or coconut aminos.

Required Equipment: a Non-Stick Skillet
This crispy tofu recipe is pan fried on the stovetop. You’ll need one special piece of equipment for this recipe: a non-stick skillet (or an alternative non-stick surface like ceramic)!
This is important because the tofu will stick if you use an aluminum or cast iron skillet. Don’t have a non-stick surface? Try my Baked Tofu instead!
How to Make Crispy Tofu: Step by Step
This crispy tofu is pan fried in a skillet, which takes around 20 minutes and is quicker than the baked version. All you need is a non-stick skillet! Here’s what you’ll need to do (or jump to the full recipe):

Step 1: Slice the tofu into cubes. Pat it dry with a towel.

Step 2: Toss the tofu with cornstarch. Place the tofu in a non-stick skillet with cold oil. Apply medium heat.
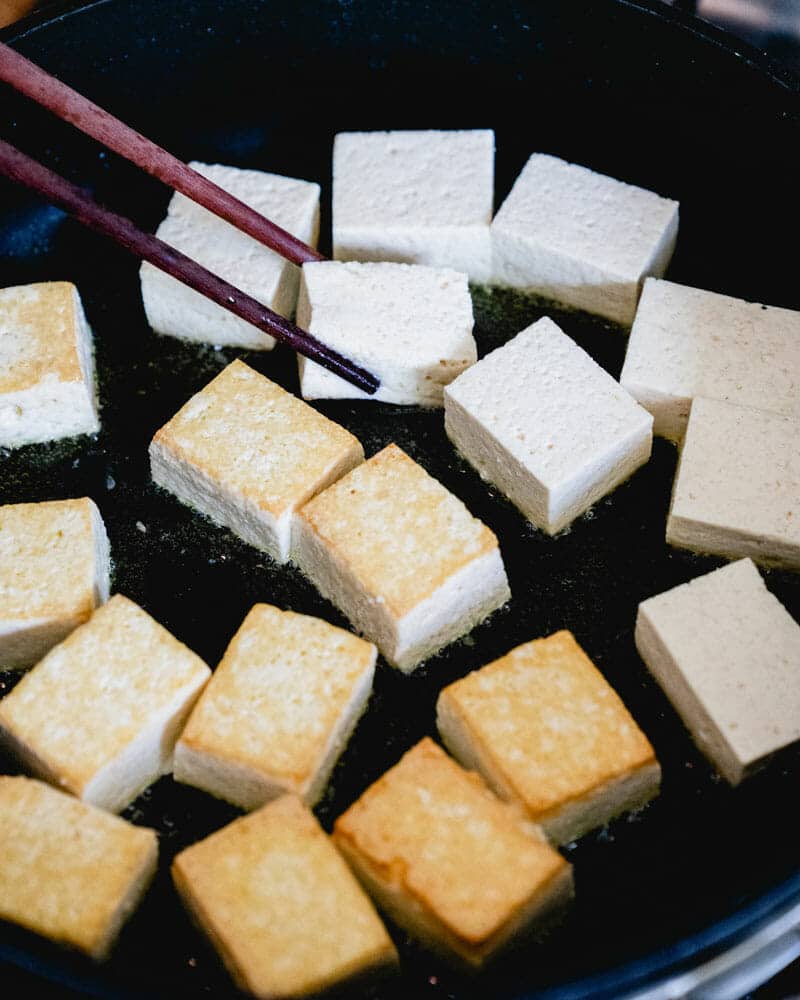
Step 3: Cook 5 to 6 minutes until one side is golden brown. Remove the pan from the heat and flip the tofu with a spatula or chopsticks. Return the heat and cook 5 to 6 minutes. Add toasted sesame oil and soy sauce. Cook 2 minutes until the tofu is crispy.
Alternatives: Baked Tofu or Air Fryer Tofu
My method for crispy baked tofu is even easier and totally hands-off, which is a great alternative if you don’t have a non-stick pan or don’t want to babysit the pan over the stove! For baked tofu, you’ll mix the tofu with cornstarch and seasonings, then bake it at 425°F for 30 to 35 minutes until crispy.
You can also make crispy air fryer tofu, which is even faster! This is actually my favorite method because it’s the quickest and easiest.
Ways to Use Crispy Tofu
Crispy tofu makes a meal! This component works with just about anything: add a grain or veggie and it’s dinner. You can also use it as a vegan or vegetarian protein to add to salads, tacos, and more. Here are a few ways to use crispy tofu:
- Rice like white rice, lemon rice, or coconut rice.
- With veggies like broccoli, green beans, Brussels sprouts or asparagus.
- Salads like tofu salad or Caesar salad.
- Bowl meals like tofu bowls, burrito bowls, or power bowls.
- With noodles like soba noodles or peanut noodles.
- In ramen, like tofu ramen.

Storage and Meal Prep
This crispy tofu keeps well in the refrigerator for 3 to 4 days. The cubes maintain a decent texture even after storing, making them great for meal prep.
If you’d like to make a double batch for meal prep, use the baked tofu variation; a skillet isn’t big enough for 2 blocks of tofu.
To reheat, you can warm in a 375°F oven for about 5 minutes, or for a few minutes in an air fryer. This restores some of the crispiness, though the cubes are tasty straight from the fridge too.
Dietary Notes
This crispy tofu recipe is vegetarian, vegan, plant-based, dairy-free and gluten-free.
Frequently Asked Questions
For the crispiest result, extra-firm tofu is the winner. It has the least amount of moisture, making it easier to get that satisfying crunch.
Not for this recipe!
Cornstarch is the magic ingredient! It creates a light, crispy coating. Toss the pressed tofu cubes in cornstarch and a bit of your favorite seasonings. Some tasty ideas:
Salt and pepper
Garlic powder and onion powder
Smoked paprika
Soy sauce
Toasted sesame oil
Troubleshooting time:
Not enough cornstarch: Make sure your tofu pieces are well-coated.
Overcrowding the pan: Make sure the tofu pieces are far apart and each have connection with the hot surface.
Not enough heat: Medium-high is best for pan-frying.
The possibilities are endless!
Add to stir-fries
Top salads
Enjoy in tacos or burritos
Make crispy tofu bowls with rice and veggies
Dip in your favorite sauces
Crispy Tofu (in 20 Minutes!)

This crispy tofu recipe is the best, with crunchy sides and a tender interior! It’s easy to make on the stovetop or baked. For the baked variation (or if you want to make a double batch), go to Baked Tofu. For air fryer, go to Air Fryer Tofu.
- Prep Time: 5 minutes
- Cook Time: 15 minutes
- Total Time: 20 minutes
- Yield: 4 1x
- Category: Main dish
- Method: Stovetop
- Cuisine: Vegan
- Diet: Vegan
Ingredients
- 14-ounces extra firm tofu
- Kosher salt
- 3 tablespoons cornstarch (or arrowroot starch)
- 2 tablespoons olive oil
- 1 tablespoon toasted sesame oil
- 2 tablespoons smoked soy sauce or soy sauce (or tamari for gluten-free)
Instructions
- Cut the tofu into 1-inch cubes and pat it dry with a clean towel. Add the tofu cubes to a bowl and sprinkle with 2 pinches kosher salt. Sprinkle with the cornstarch, turning the cubes with a spatula, until evenly coated.
- Add the olive oil to a large, cold non-stick skillet* (this is important; it only works with non-stick surface!). Add the tofu cubes in a single layer.
- Turn on the heat to medium-high. Cook 5 to 6 minutes until lightly browned on the bottom.
- Briefly remove the pan from the heat to reduce spitting. Flip the tofu with a spatula. Return to medium-high heat and cook an additional 5 to 6 minutes until browned.
- Briefly remove from the heat again and drizzle with the sesame oil and soy sauce (watch for spitting). Return to low heat and cook, turning often, until the sauce has evaporated and the tofu has darkened in color, about 2 minutes. Taste and if desired, add a few pinches salt. Serve immediately or refrigerate for up to 3 to 4 days. Perfect for adding to salads, bowl meals, and more.
Notes
Baked Tofu variation: If you don’t have a non-stick pan or want to make a double batch (a skillet isn’t big enough for 2 blocks), go to Crispy Baked Tofu.
Air Fryer Tofu variation: If you have an air fryer, this is my favorite method because it’s super quick and easy. Go to Air Fryer Tofu.
Leftovers and reheating info: Leftovers store well in the refrigerator for 3 to 4 days. The cubes maintain a decent texture even after storing. To reheat, you can warm in a 375°F oven for about 5 minutes, or for a few minutes in an air fryer.
More Tofu Recipes


from A Couple Cooks https://ift.tt/C9Bji1K
Comments
Post a Comment